
Pencil Man / Bleistiftmännel
See Disclaimer / Siehe Haftungsausschluss
Hi, here´s a pictorial of my little pencil man inspired by Doug Linker in his YouTube video " Most Fantastically Simple Yet Satisfying Carving Ever ", which is actually a carving tutorial for making a wizard or wood spirit. At about 1 minute and 24 seconds and at 18 minutes and 4 seconds into the video he shows you a carving of the wizard applied to a pencil. So that´s where I got the idea and did my own little version.
If you are not familiar with Doug Linker´s wood carving videos, they are really worth the while. Doug has a pleasantly unique and fun way of showing you how to carve a wide variety of wood figures. So check ´em out.
Tipp: You can enlarge the pictures by just klicking on them. Scroll to leave enlargement.
Hi, hier eine bildliche Darstellung eines Bleistiftmänchens inspiriert von Doug Linker in seinem YouTube video " Most Fantastically Simple Yet Satisfying Carving Ever ", dass eigentlich ein Lehrvideo von einem Waldgeist oder Zauberer ist. Bei 1 Minute 24 sekunden und 18 Minuten 4 sekunden im video zeigt Doug ein Versuch, dieser Figure auf einen Bleistift zu schnitzen. Daher habe ich die Idee, meine eigene Version zu versuchen.
Es lohnt sich auf jeden Fall, die Lehrvideos von Doug anzuschauen. Selbst wenn man kein Englischkenntnisse besitzt, kann man durch seine detaillierte Darstellungen gut erkennen, wie die Figuren hergestellt werden.
Tip: Klick an´s Bild zu vergrößern, scroll weiter, um die Vergrösserung zu velassen.


My standard equipment ( click on pic to enlarge )
Meine standard Ausrüstung ( klick an´s Bild zum Vergrössern )

Standard sized pencil
Standard Bleistiftgröße

I use a caliper to mark the distances, but ruler will also do.
Ich nutze einen Schiebleher, um die Maße zu markieren, aber ein Lineal tut´s auch.

Marks at 5mm on all 6 points.
Markierungen bei 5mm an alle 6 Spitzen.

Stop cut
Stopcut


Marking the front of the carving. Pencils are always made in two halves, and the wood colors often do not match. So picking the front is the most important step before moving on. I always choose the lighter side. I think it makes a better carving.
Die Voderseite markieren. Bleistifte sind immer in 2 Hälften hergestellt, und die Farben sind oft unterschiedlich. Die Vorderseite zu bestimmen ist sehr wichtig. Ich nehme immer die hellere Seite. Ich meine, es gibt ein besseres Ergebnis.


Here you can see how the pencil is divided and the orientation of the front and back. A hexagon pencil has 6 points and 6 flats. I´ll be refering to them throughout the pictorial.

Hier sieht man, wie der Bleistift geteilt ist, und die Orientierung von vorne und hinten. Ein sechskannt Bleistift hat 6 Spitzen und 6 Ebenen. Die werden von mir mehrmals in diesem Pictorial erwähnt.


First the 6 points.......
Erst die 6 Spitzen.......


then the 6 flats.
dann die 6 Ebenen.


Marking the hairline.
Der Haaransatz markieren.

Marking the hairline.
Haarverlauf markieren.


Marking the nose.
Nase markieren.

Marking the bottom of the nose with a pencil and then with a stop cut.
Das untere Ende der Nase erst mit Bleistift, dann mit Stopcut markieren.


Marking the sides of the nose with pencil, then stop cuts. The side cuts should be vertical and not at a slant.
Die Nasenseiten mit Bleistift markieren, dann Stopcuts. Die Sopcuts für die Nasenseiten sollen vertical und nicht schräg verlaufen.

Eyebrow stop cut
Augenbrauenstopcut

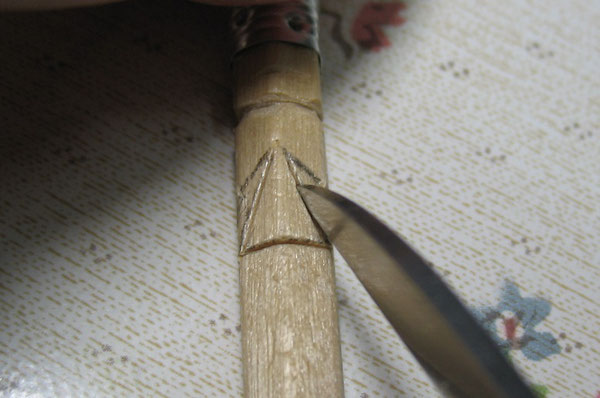
Cutting out the eye-nose triangels.
Die Augen-Nase dreiecke ausschneiden.


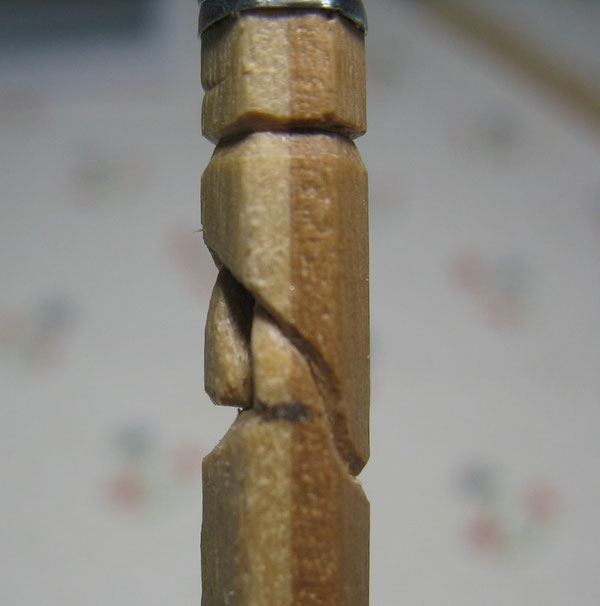
Shaping the nose.
Das Formen der Nase.


A toothpick is often very helpful for removing stubborn chips.
Ein Zahnstocher ist oft sehr nützlich, um sture Späne zu entfernen.


Taking off a bit under the nose.
Ein Bisschen unter der Nase wird weggeschnitten.


Rounding off the nose.
Die Nase abrunden.


Stopcutting the Hairline.
Stopcut an Haaransatz.

V-cut on the lower half of the Hairline. It´s very important not to cut too much here because this cut defines the upper cheeks. Better to take a tiny cut then correct when necessary.
V-cut an der untere Hälfte des Haaransatzes. Es ist hier sehr wichtig, dass der Schnitt nicht zu breit gerät, weil die obere Backenhälften dadurch geformt werden. Besser einen kleineren Schnitt, dann nach Bedarf nachschneiden.

Upper cheeks are now formed.
Obere Backen sind jetzt geformt.


V-cut on the upper Hairline.
V-schnitt an oberen Haaransatz.


Marking the sides of the cheeks with pencil, then stop cuts.
Markierung an der Seiten der Backen, dann Stopcuts.


V-cuts on the lower cheeks being careful not to cut too much. Again here light cuts then correct if necessary.
V-schnitte an unteren Backenhälften. Nochmal leichte Schnitte, dann bei bedarf nachschneiden.

Bottom of cheeks now formed.
Untere Backenhälften jetzt geformt.


Rounding off under the nose.
Unter der Nase abrunden.


Marking the mustache.
Schnurrbart markieren.

Here you can see how small the chips generally are.
Hier kann man die typische Größe der Späne sehen.

Marking bottom of beard.
Das untere Ende des Barts markieren.


Beard stop cut.
Bart Stopcut.

Marking the mustache.
Schnurrbartmarkierung.


Stop cuts.
Stopcuts.


V-cuts around Beard and mustache.
V-schnitte um die Bart und Schnurrbart.

Another look at the size of the chips.
Nochmal einen Blick uaf die Spänengrößen.


The pockets of the robe.
Die Taschen der Robe.


Marking the arms at the back.
Markierungen für die Arme.


Stop cuts for pockets and arms......
Stopcuts für Taschen und Arme......

followed by V-cuts.
gefolgt von V-schnitte.


Continue with Part 2.
Im Teil 2 geht´s weiter.